
Perhaps you’re curious about your family history and want to learn more about your ancestors. Maybe you’re wondering who you inherited your eyesight from. You could be on a hunt for potential relatives you never knew existed. Whatever reason you may have, creating a family tree can be a fun and insightful experience.
Not only will you learn more about your family, and where you come from, but you will also have a tangible and organized way to keep track of your research. As your family tree grows, it will become a valuable resource for future generations, or an heirloom that lasts for long into the future. You can use Flying Logic to quickly create a family tree in an interactive and fun way! Read on to learn how this works.
Transcript continues after video.
Flying Logic Setup
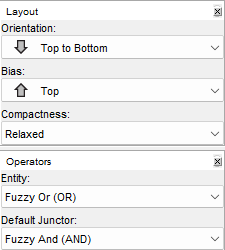
Since a family tree makes use of the basic tree structure, the Orientation can be changed to suit your preferences. We’re using the Top to Bottom Orientation in our example tree, as most families trees are created in this orientation. You could use the Left to Right Orientation, vise versa, or even Bottom to Top, depending on your situation.
However, we recommend you set the Bias to wherever the tree “stems” from. These will be the oldest members of the family you include in your chart. For our example, this means the Bias will be set to the Top. This will ensure the most clarity while creating a tree.
It’s also important to ensure that the Default Junctor setting, located in the Operators menu, is set to Fuzzy And (AND). Flying Logic organizes families by making use of junctors, and because it takes two individuals together to have children, you want to label the junctor “and” instead of “or.”
The domain and entities you use are also up to you, and will vary depending on your needs. In our example we use a simple “Family Tree” domain, which consists of two entities: Male and Female. This is based on genetic categorization (which is binary) and not gender identity. If you wish to have additional or alternate categories for any reason, you can create your own domain to personalize your tree to your needs.

However, if you wish to use the domain from this example, you can. The Family Tree domain is not included in a default Flying Logic 3 document, so there is a bit of a process that needs to happen in order to access it.
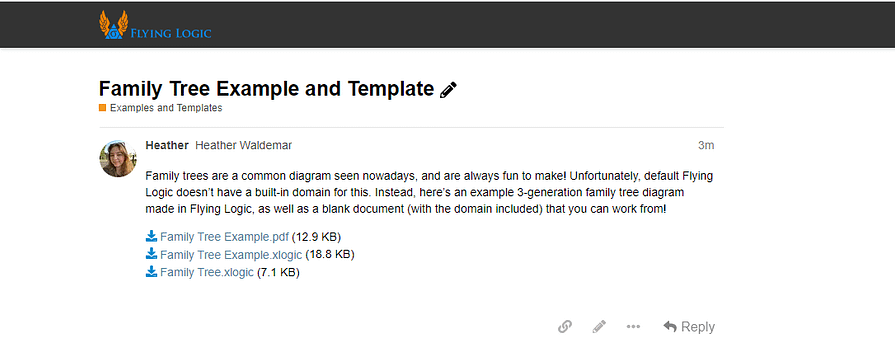
To begin, use this link to access the example Family Tree domain.
These are created with a Family Tree domain, so they contain what you need for a new Family Tree document.
You’ll be taken to a page with three options for download. Click on the last option, Family Tree.xlogic to download an empty document that contains a Family Tree Domain.
Open this Family Tree.xlogic file in Flying Logic, and a new blank document will open with the Family Tree domain.
Now you can begin working on the diagram.
Step 1: Determine the Purpose of Your Family Tree
There are many reasons for creating a family tree, and each impacts how your tree is created and what information it includes. To illustrate, if you want to create a sentimental tree as a keepsake, you may want to include more members of the family than if you were solely creating a map of genetics being passed down (similar to a pedigree tree).
Some things to determine before beginning your tree are:
- Why are you creating a family tree (are you mapping a specific trait, the family history, creating an heirloom, etc.)?
- How many generations are you wanting to include in your tree?
- Are you wanting to include multiple families in your tree (such as the families of members who married into the family)?
- What information do you want to include in your tree? (This could include ages, birth/death dates, specific genetics, major accomplishments, relationships, or locations, name inheritance, etc.).
Step 2: Research Your Family
Researching your family history is usually an essential step to prepare to diagram your tree. If you’re planning on creating a complex tree, or if you were planning on simply tracking your ancestry through many generations, you’ll end up with a large amount of information to track. It’s helpful to already have the information handy while organizing individuals and their relationships.
Researching beforehand can also be helpful in finding information to include in entities. For example, you could find the birth and death dates of members of your family to include alongside their names. You could also include notable achievements, locations of birth/death, ages, etc. This can be particularly relevant in cases of creating a tree for a family that is not your own, such as a royal family of a country or a significant historical family.
This is also the most likely step to discover long-lost family members. If you’re looking out for any, pay extra attention to gaps in information, and dig deeper!
Step 3: Build Your Family Tree
Now you’re ready to get into the bulk of creating your tree. There are a few ways to go about this, however our example covers the most common way of building a family tree, from the oldest members to the youngest. If you’re beginning from a different point of reference, you may need to alter the order you add members.
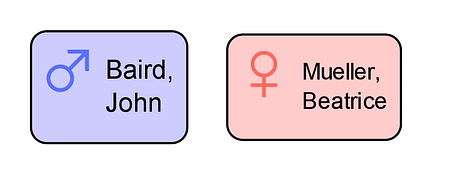
1: Begin with the Eldest Members
These will be the people who are as far back along your tree as you’ve decided to include. Depending on your tree, these could be grandparents, great grandparents, great great grandparents, etc.
You can drag and drop these entities onto the canvas to start. At the moment, there is no visual connection between the two, so they’ll be floating on the canvas until the next step.
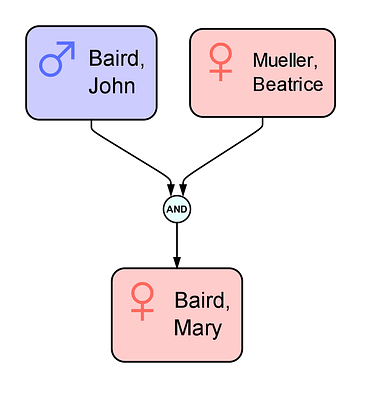
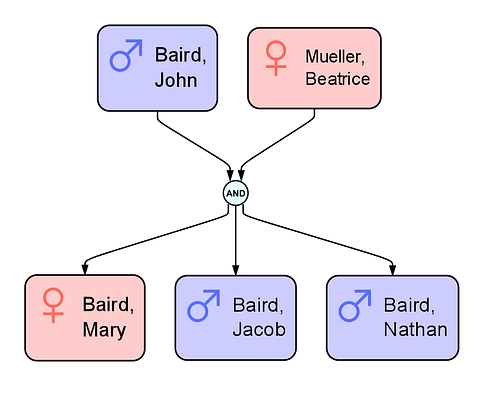
2: Add the Children of the Eldest Members
Now you can add the next generation of members to your tree. These will be the children of the two entities already on the canvas.
To add the children to your tree, add an entity as a successor to one of the parents. Then, connect the edge of the other parent to the one connecting the parent and child. This will create a junctor that symbolizes the parent-child relationships.
To add siblings, you can drag an entity to that junctor, and it will create a new child edge leading to it. Do this for as many entities as needed.
3: Add the Families of the Children
When you add a second parent (one who married into the main family), the entity is pushed to wherever the Bias is set to, which is why we suggest above to have the Bias set to wherever the eldest members of the tree are located.
Also, it’s easiest to add both the parent and the children of a specific familial group at once.
To illustrate, when a second parent is added to the canvas without it’s respective children, the canvas will look like so:
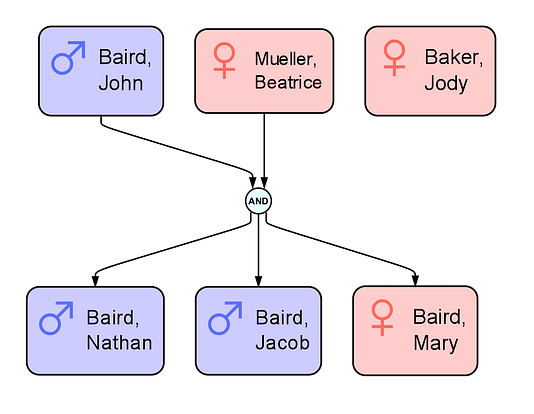
As you can see, it’s unclear who Jody Baker has children with. To fix this, you must also add the children of the couple, like so:
Now it’s clear who’s had children with who, and who’s children are who’s! The catch is that the entities that marry into the family are pushed to the area the Bias is set to. There are a few ways to clarify this that we discuss later, but for now it’s simpler to leave it as is.
4: Continue Working Down to the Youngest Members
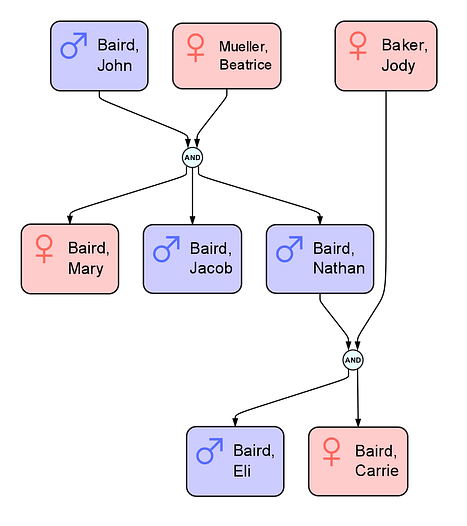
To continue building the tree, repeat the steps above for however large you want your tree to be! Add the parents of the children, and then the children. Work your way down the generations until you reach the youngest members of your family.
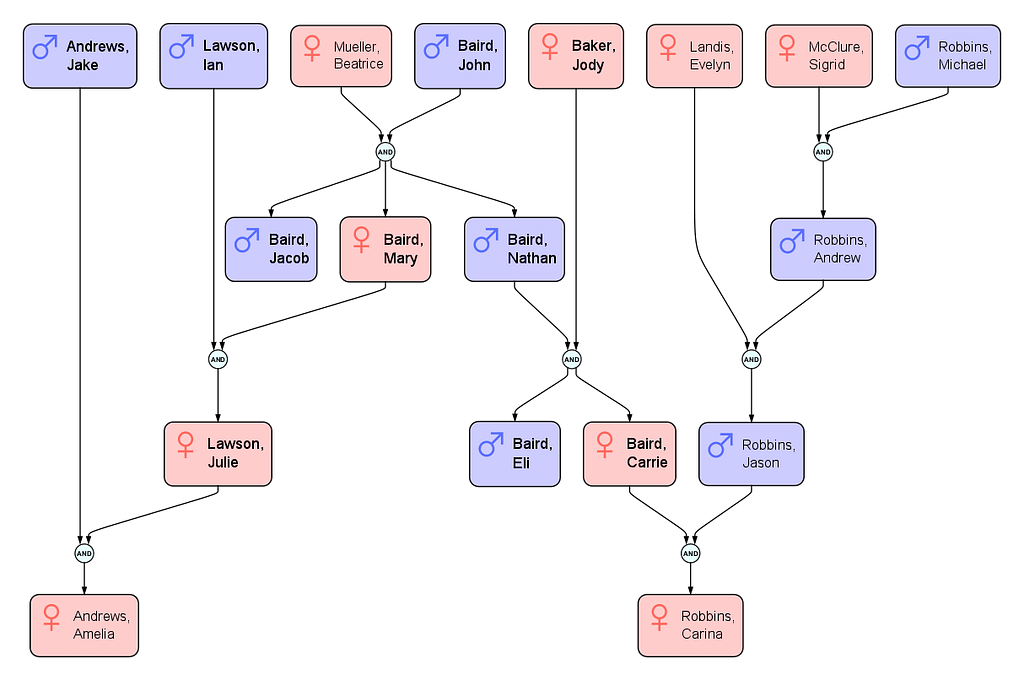
Repeating the steps will end up with a family tree that may look similar to this:
Note: If you stumble across a strange situation in your family tree, check out the special cases at the end of the article. It includes ways to chart potentially confusing situations.
Step 4: Weave other Families into Your Tree
If you have information on anyone who entered into your family’s biological tree, you can add those too! Depends on how complex and informative you would like your tree to be. This may be the most helpful when charting a specific trait or genealogy, however it could hold sentimental value as well.
This can also hold a benefit in making the tree easier to read. By adding the members of the family of someone who entered into the main family, you can actually create a situation where a partner will be on the same generational layer as the person they had a child with or married instead of where the Bias pushes them too. However, you need to chart the partner’s family as far back as the main family for this to work.
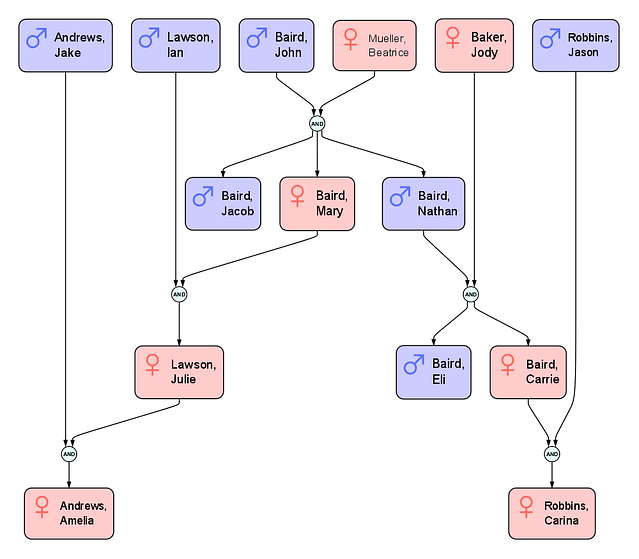
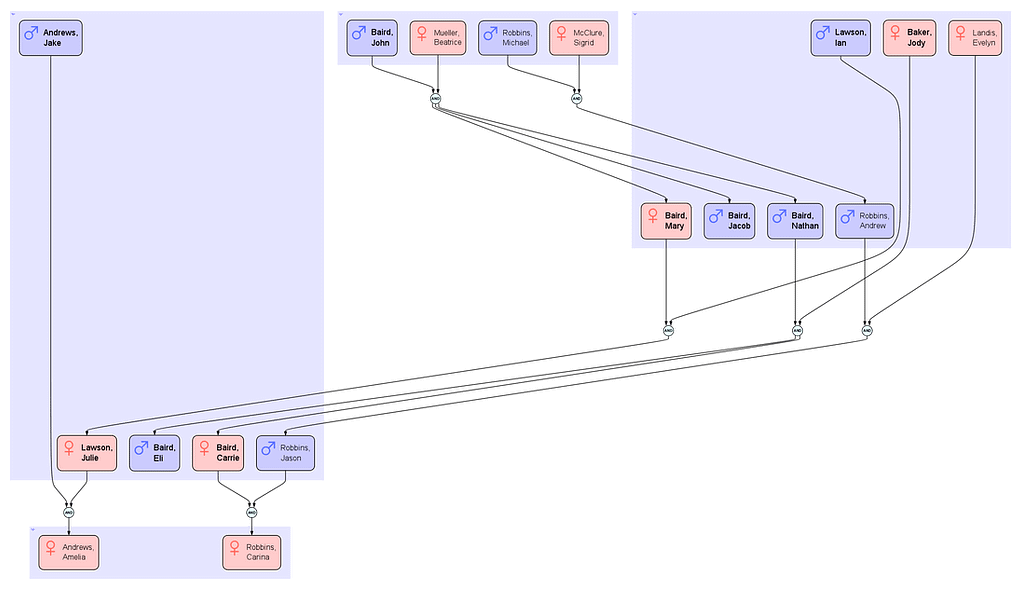
Adding the family of an entity who’s entered into the main family follows the same steps as creating the first tree. This time, you may want to work backwards, adding their parents, and then their grandparents, etc. By the end of this process, you should end up with a tree that looks similar to this:
In the example above, Jason Robbins’ family is partway charted, with his father’s family being charted enough for Jason Robbins to line up with his partner, Carrie Baird
The cost of generational clarity is the fact that adding so many family branches will create a tree with an abundance of information to read through. This may be a helpful addition to a tree, or could be a hindrance to others.
Step 5: Group Together Generations
Due to the nature of Biases, your family tree may be looking a little strange to looking, as certain ancestor entities will be all over the place instead of lined up with their respective age groups. To make your tree easier to interpret, you can group together generations!
To do this, you’ll want to select all of the members of the family that fall into a particular generation. Since the entities are in multiple different locations on the chart, the easiest way to make a selection is to continuously hold down SHIFT while right-clicking all of the entities for a particular generation. There will be a green outline on any entity, edge or junctor you select. Press CTRL+G (Windows) or COMMAND-G (Apple) to group all of the selected entities.
Notes: Special Cases
Families are complicated, and at this point you may have come across a non-traditional aspect to your chart. Keep reading to learn about a few of them, and how to include them in your tree!
Cases with More than Two Parents
There are many cases where multiple parents are included in the life of one child. These could include polyamorous relationships, sperm/egg doners, or adoption. When deciding who to include in these situations, it is important to remember what the purpose of your family tree is. If your chart is documenting solely genetic traits, perhaps you only want to only include the two people who’s genes went into the child. If you’re working with a more sentimental tree, you may want to include all of the parents that are a part of the child’s life (for example, a child’s adoptive and biological parents).
You add multiple parents to a tree the same way you would add the usual set of two parents. All of the parent’s edges can be combined into a junctor before branching out to the children entities.
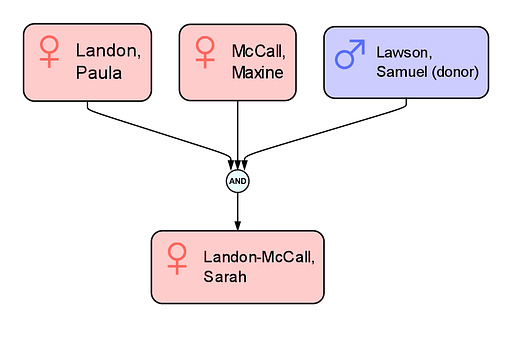
It may not be clear what’s going on when more than two parents are charted. To sidestep this, you can always include clarifying information in your entities.
Cases including Step Parents and Half Siblings
Others slightly unusual situations that arise when creating a family tree are step-parents and half siblings. These can be similar to a multiple parents situation, however there are notable differences that may affect your family tree. Perhaps the partner already had children before they married the step-parent, and then had another child with the step parent, creating a few half sibling relationships. This also creates a genetic difference amongst the children that you may want to specify in your chart.
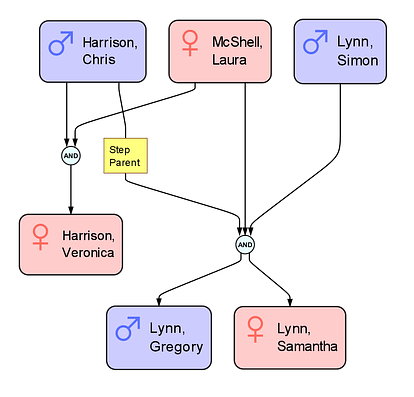
To add a step parents, you’ll want to ensure that the all three (or more) parent entities are added.
Then, to add half children, you may want to add the families of each partnering one at a time, without adding the step parent relationship. Once that’s finished, you can add an edge from the step parent (or current partner of the mutual parent) to the junctor of the half siblings. Add an edge annotation to clarify the step parent’s relationship to the children, like so:
Cases of Incest
Cases of incest will arise in some trees due to cultural, generational, or other aspects. If you go back far enough on your tree, you will come across a case of incest due to a concept called “Pedigree Collapse.”
Pedigree Collapse is the idea that if you were to track your ancestry in the general mother + father = child fashion, you would pool more ancestors than there were people on the planet during that time. It’s statistically impossible to have a family line with no incestual relationships. So, there may arise a situation in which an incestual relationship may be charted on a family tree.
You chart an incestual relationship the same way you chart any other relationship, by connecting the two parents into a junctor, with children then branching off of it.
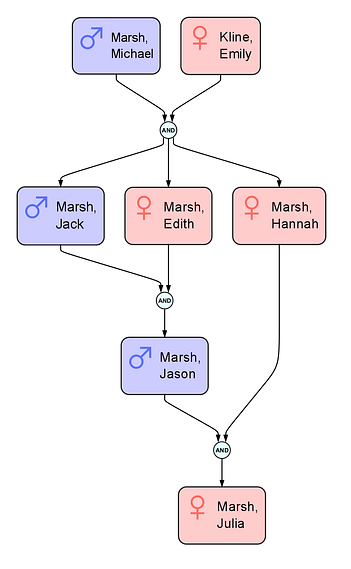
In this example, there’s both a case of incest between siblings, and an aunt/nephew relationship. There are other possible pairings, however they will function in the same way as the ones above do.
What’s Next?
Wanting to do more with Flying Logic? You may want to check out these articles…
How to Create a Goal Tree with Flying Logic